Firewall Overview
Opengear firmware is equipped with a powerful firewall stack based on leading open source firewalld and nftables tools. The default firewall rule set is configured with a default-deny policy.
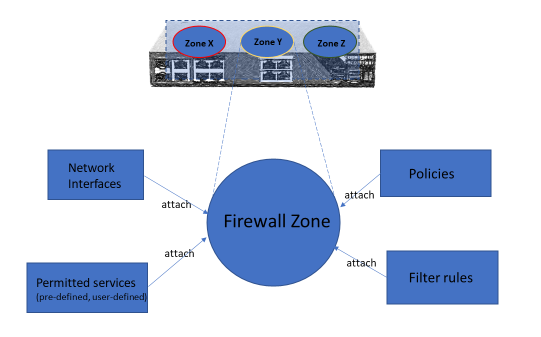
The firewall is based on the concept of configurable Zones. Zones enable operators to create multiple “firewall segments” per node and attach network interface(s), services, filtering policies and filtering rules to the zones.

Note:To access services, a user must have both access through the firewall and the appropriate authorization, e.g. via a local user account or remote AAA.
There are several kinds of rules and policies that may be applied to Zones.
Firewall Rules
-
Permitted Services Rules allow access to Services for requests arriving on interfaces in the Zone – Services are configurable collections of TCP/UDP port or ports (e.g. TCP port 443 is the HTTPS service for web UI and REST API access). There are pre-defined services and supports user-defined services as well.
-
Custom Rules allow the full flexibility of firewalld's rich rule syntax for fine-grained access control and advanced applications.
Firewall Policies
-
Interzone Policies control how Zones may forward traffic between each other – by default Zones may not forward between each other (note that interfaces in the same Zone may always forward between themselves).
-
Port Forwarding Rules use destination NAT (DNAT) requests arriving on interfaces in the Zone to an external Target IP/Port, e.g. a web server running on another host
-
Additionally, you can apply source NAT (SNAT) to traffic going out of a Zone by checking the Masquerade Traffic option.
Example WebGUI Configuration
The following examples use Permitted Services Rules and Custom Rules features
Note: Some aspects of the UI may change in future releases.
Example 1: Disallow WAN Zone access to HTTPS
The default configuration is to allow HTTPS (ie. the web UI & API) on the WAN Zone. To disallow this:
Note: Ensure you are accessing the device via an interface outside the WAN Zone (e.g. NET2 which is the LAN Zone by default) or you will be locked out.
-
Login to the web UI as an Administrator user.
-
Select CONFIGURE > FIREWALL > Management.
-
Click WAN then Edit Zone.
-
Scroll down to Permitted Services.
-
In the right-hand column, click – to remove https service.
-
Any service in the right-hand column allows everyone access to this service from this zone.
-
Click Apply.
Example 2: Permit access to WAN Zone HTTPS from a trusted source network only
When a service is permitted using a Permitted Services Rule, connections to the service in that Zone are permitted regardless of the originating network the connection is coming from. To disallow connections from all but a trusted source network, use Custom Rules (examples below) instead.
In this example, HTTPS connections from the 10.12.34.0/24 network to the Console Manager's WAN Zone are permitted, other HTTPS connections on the WAN Zone are disallowed.
Note: Ensure you are accessing the device via an interface outside the WAN Zone (e.g. NET2 which is the LAN Zone by default) or from the trusted source network, or you will be locked out.
-
Login to the web UI as an Administrator user.
-
Select CONFIGURE > FIREWALL > Management.
-
Click WAN then Manage Custom Rules.
-
Click Add Custom Rule.
-
In Description enter: Trusted HTTPS.
-
In Rule Content enter:
rule family=ipv4 source address=10.12.34.0/24 service name=https acceptNote:This is supported via firewalld ‘rich-rules’ option.
-
Click Apply.
-
Follow the steps in Example 1 above to remove the HTTPS Permitted Service.
Note: It is not recommended to mix firewall configurations between the UI (webgui/CLI) and firewalld commands (firewall-cmd) from Linux shell. Commands may be overwritten. Recommended to use either webgui or CLI for all supported functionality instead of firewall-cmd
Custom Rules (firewalld “rich-rules”)
This feature enables users to define fine-grained control of services inside a zone. Users can apply custom filter rules to traffic in a firewall zone based on Layer2 Ethernet MAC, L3 IP fields, layer 4 ports, pre-defined services. Actions to permit, deny, drop the defined packets can be included in the rule. Logging facility is also provided via custom rules.
The following sections provide examples and many sample templates that users can directly use in webGUI or CLI in the rich-rules field/section
Custom Rules Examples:
Example 1: Filter (drop) specific IPv4 source address
rule family="ipv4" source address="34.34.36.36" drop
Example 2: Permit specific source subnet and list of address
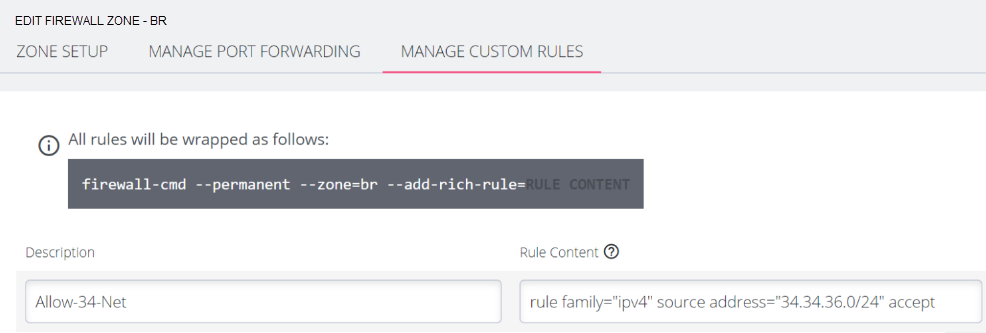
rule family="ipv4" source address="34.34.36.0/24" accept
Example 3: Permit Specific Service (HTTPS) from a specific source subnet:
rule family="ipv4" source address="10.0.0.0/16" service name="https" accept
Example 4: Drop Specific Service (HTTP)
rule family="ipv4" service name="http" drop
Example 5: Permit specific source subnet and log connection attempts
rule family="ipv4" source address="10.0.0.0/16" accept log
Example 6: Permit IPv6 packets with source address, TCP port number 4000. Log the packets
rule family="ipv6" source address="1:2:3:4:6::" port port=4000 protocol=tcp accept log
Example 7: Permit IPv6 packets with source address, only TCP protocol, from all TCP ports. Log the packets
rule family="ipv6" source address="1:2:3:4:6::" protocol value="tcp" accept log
Useful Templates for use in the webGUI or CLI
In the webGUI –

In ogcli
ogcli replace firewall/zones << 'END'
firewall_zones[0].custom_rules[0].description="allow rule"
firewall_zones[0].custom_rules[0].rule_content="rule family='ipv4' source address='192.168.67.101/32' service name='telnet' accept"
…
END
Sample Rich Rules Templates
1. rule family="ipv4" source address="<user-to-fill>" accept|drop|reject
2. rule family="ipv4" destination address="<user-to-fill>" accept|drop|reject
3. rule family="ipv4" destination address="<user-to-fill>" accept|drop|reject
4. rule family="ipv4" source address="<user-to-fill>" accept|drop|reject
5. rule family="ipv4" source address="<user-to-fill>" destination address="<user-to-fill>" accept|reject|drop log
6. rule family="ipv4" source address="<user-to-fill>" service name="<user-to-fill>"" accept|reject|drop
7. rule family="ipv4" source address="<user-to-fill>" destination address="<user-to-fill>" accept|reject|drop log
8. rule family="ipv4" source address="<user-to-fill>" destination address="<user-to-fill>" accept|reject|drop log
9. rule family="ipv4" source address="<user-to-fill>" port port=<usr-to-fill> protocol=tcp|udp accept|reject|drop
10. rule family="ipv4" source address="<user-to-fill>" protocol value="tcp|udp" accept|reject|drop
Note: The order of rules is important.
In the Template:
-
Choose one of the actions accept|reject|drop [Drop action does not send any response back to source, reject does].
-
For protocol value, tcp and udp examples are given in template, but many other choices are available.
-
For values, source address as example, replace <user-to-fill> with the address. Address can be with or without subnet.