Date & Time
CONFIGURE > SYSTEM > DATE & TIME > TIME SETTINGS
It is important to set the local Date and Time in your Opengear device as soon as it is configured. Features such as Syslog and NFS logging use the system time for time-stamping log entries, while certificate generation depends on a correct Timestamp to check the validity period of the certificate.
Your Opengear device can synchronize its system time with a remote Network Time Protocol (NTP) server. NTP uses Coordinated Universal Time (UTC) for all time synchronizations so it is not affected by different time zones.
You need to specify your local time zone so the system clock shows correct local time. The Date & Time section of the navigation bar provides a means to
-
Set the time zone
-
Manually set the correct time and date
Or
-
Set the date and time by NTP Server
Continued:
Manual Date & Time Set
-
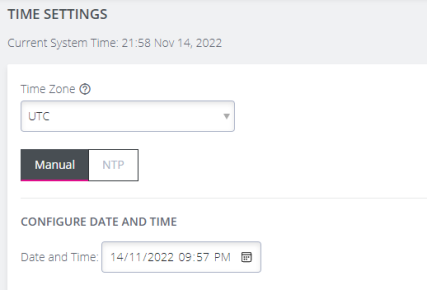
Navigate to CONFIGURE > SYSTEM > DATE & TIME > TIME SETTINGS.
-
Select the applicable local time zone from the global time zone drop-down list, then, select Manual in the Time Zone section of the page.
-
Select the correct date and time from the Date/Time Calendar.
-
Click the Apply Date and Time button.
NTP Configuration & Authentication
Configuring an NTP server ensures the Opengear device clock is kept accurate (once Internet connection has been established).
When defining an NTP server you can choose to supply an Authentication Key and Authentication Key Identifier or not to use Authentication. If NTP Authentication keys are in use, the NTP server must be verified using the Authentication Key and Authentication Key Index before synchronizing time with the server.
-
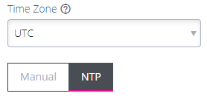
Navigate to CONFIGURE > SYSTEM > DATE & TIME > TIME SETTINGS.
-
Select the applicable time zone from the global time zone drop-down list, then, select NTP in the Time Zone section of the page.
-
In the Remote NTP Server List section of the page, click Add NTP Server. The 'Remote NTP Server List' opens.
Note:If your external NTP server requires authentication, you need to specify the NTP Authentication Key and the Key Index to use when authenticating with the NTP server.

-
Enter the IP address of the remote NTP Server.
-
If Authentication is required, select Yes and complete all sections of the Authentication Key form.
-
Click the Apply NTP Settings button.
CLI Commands Associated with NTP Configuration
Generate a new key:
chronyc keygen $INDEX $ALGORITHM
Examples:
chronyc keygen 1 SHA3-512
chronyc keygen 50 SHA1
chronyc keygen 2345 AES256
Check chronyd service:
systemctl status chronyd.service
journalctl -b 0 --unit chronyd.service
Check if the server has clients
chronyc clients
Check if the client is synchronizing:
chronyc sources - shows a list of servers available to the system, status, and offsets from the local clock and the source
chronyc sourcestats - show additional statistics for each server
chronyc tracking - see what server chrony is tracking with and performance metrics from that server execute
chronyc activity - see the number of servers and peers that are connected
chronyc ntpdata - returns data about each configured server
Check the NTP packets
tcpdump -vvv -i any udp port 123
OM specific CLI Commands
ogcli get services/ntp
ogcli help services/ntp
ogcli replace services/ntp enabled=false - disable NTP and clear all servers and keys.
ogcli update services/ntp enabled=false - disable NTP, but keep servers and keys settings.
cat /etc/config/chronyd.conf
cat /etc/config/chronyd.keys