Configure a VLAN
The OM Series has flexible Ethernet capabilities, including support for VLANs. More specifically, it supports 802.1Q VLAN tagging to allow a trunked connection into an external switch or other device. It also supports the Linux logical "bridge group" feature which is the ability to group physical and virtual interfaces together. This can be used to group switch ports together, and to map physical switch ports into VLANs to create what are commonly referred to as "access ports" for those VLANs.
Picture a VLAN as a network that is usually segmented by function or application. VLANs behave much like physical LANs, but you can group hosts even if they are not physically co-located. A switch port can belong to a VLAN.
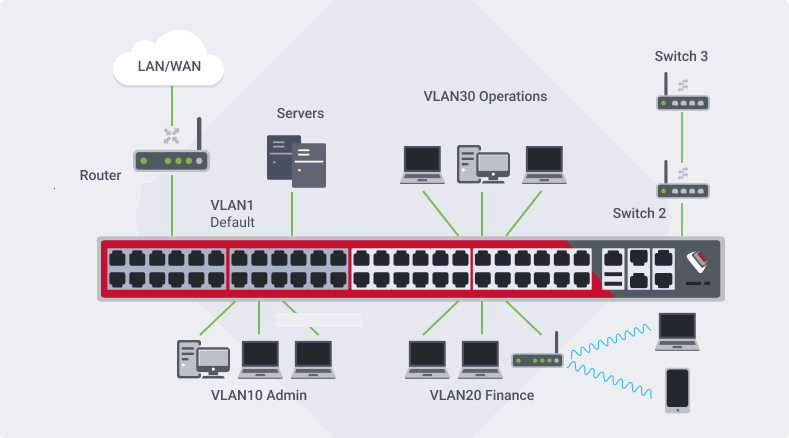
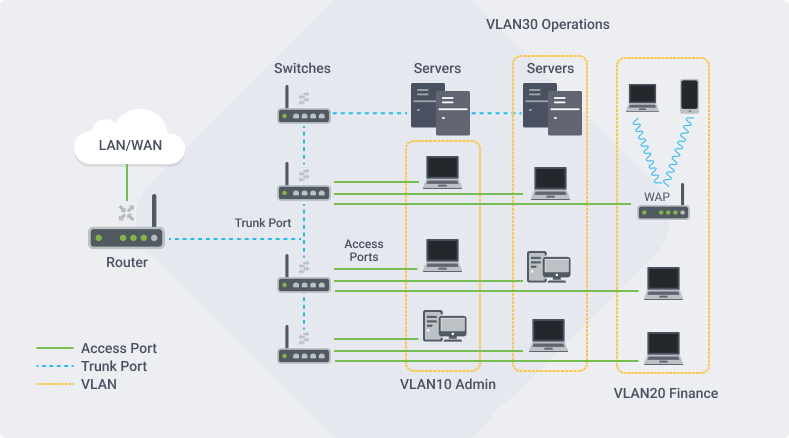
VLANs allow you to make separate broadcast domains on a switch. The broadcast domains can associate with one another with the help of a Layer 3 device such as a router. A VLAN is mainly used to form groups among the hosts regardless of where the hosts are physically located. In a bigger network, the configured VLANs with interfaces assigned as access and trunk ports on switches could look like this:
Switch Ports
For models with built-in switch ports, by default these are configured in a single bridge group called "Switch", which effectively puts all the switch ports into one virtual LAN or layer 2 broadcast domain. This default "Switch" bridge group can be deleted, and each of the switch ports is capable of being configured as a separate layer 3 interface with its own IP address. Alternatively, a number of switch ports can be grouped together using a bridge, to make a virtual LAN of any size. A bridge group can also include an 802.1Q VLAN interface (configured on a trunk port), effectively mapping the physical ports into that VLAN as "access ports".
IP Addressing
In order to communicate with an Ethernet interface, VLAN or bridge group, the OM must have a configured IP address on what is called a connection or "conn". This is similar in concept to a layer 3 subinterface or virtual interface on other networking equipment. The connection can be assigned to the bridge itself, or any of the members, including any physical (access) port or the 802.1Q VLAN, which makes the configuration quite flexible. For example, you can have a VLAN trunk with multiple 802.1Q VLANs, and each can be configured with a connection (IP Address information) so the OM appliance can communicate with other hosts on those VLANs. You can configure switch ports to operate individually, or in bridge groups (to make virtual LANs), and assign these IP addresses using a connection. You can combine these two by creating a bridge group that has an 802.1Q VLAN member and one or more switch ports, which become "access ports" to that VLAN.
Local VLANs
If the requirement is to just to group OM switch ports together into a "local" virtual LAN, but there is no need for a trunk, then this does not require a VLAN to be configured on the OM, you just need a bridge group, which behaves like a L2 virtual LAN. Create a new bridge group, assign the OM switch ports, and optionally create a new connection to add an IP address.
Navigate to Configure > Network Connections > Network Interfaces, then click on the New Bridge icon to create a new bridge group. Give this a name, then select the Switch Port(s) that you want to connect into this bridge group (local VLAN). Hit Create and the bridge group will be created.
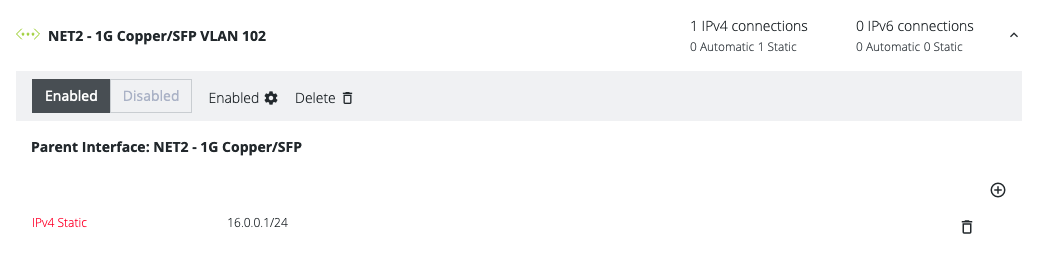
Below is an example of VLAN 102 on the NET2 trunk port, with 16.0.0.1 address assigned:
Configure OM Switch Ports as VLAN access ports (untagged ports)
To map the OM switch ports as "Access Ports" into a trunked VLAN, the OM uses a Bridge Group to join the switch port(s) to the same Layer 2 bridge domain as the VLAN subinterface, effectively bridging them together.
If the OM switch ports are still in the default "Switch" bridge group, you can delete or leave in place the "Switch" bridge group. Then you can assign some of the switch ports into new bridge group(s).
Go to Configure > Network Connections > Network Interfaces ... then click on the New Bridge icon to create a new bridge group. Give this a name, then select the Switch Port(s) that you want to connect into this bridge group (VLAN), and finally select the VLAN subinterface that you created on the Trunk port, e.g. NET2 - VLAN 22. Hit Create and the bridge group will be created.
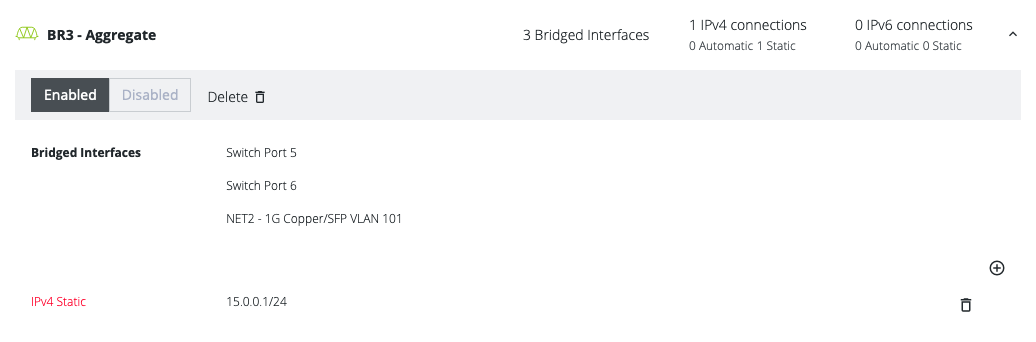
Below is an example of bridge group BR3 with switch ports 5 and 6 bridged into VLAN 101 on the NET2 trunk. Switch ports 5 and 6 are now effectively untagged VLAN ports since the VLAN 101 trunk port NET2 is now in the same bridge group BR3. The subinterface NET2/VLAN101 is a 802.1Q tagged port. Note that the OM has a static IP address of 15.0.0.1 on this bridge group (VLAN).